
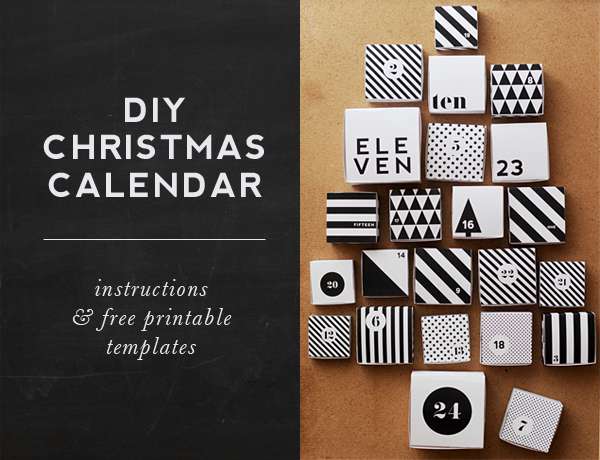
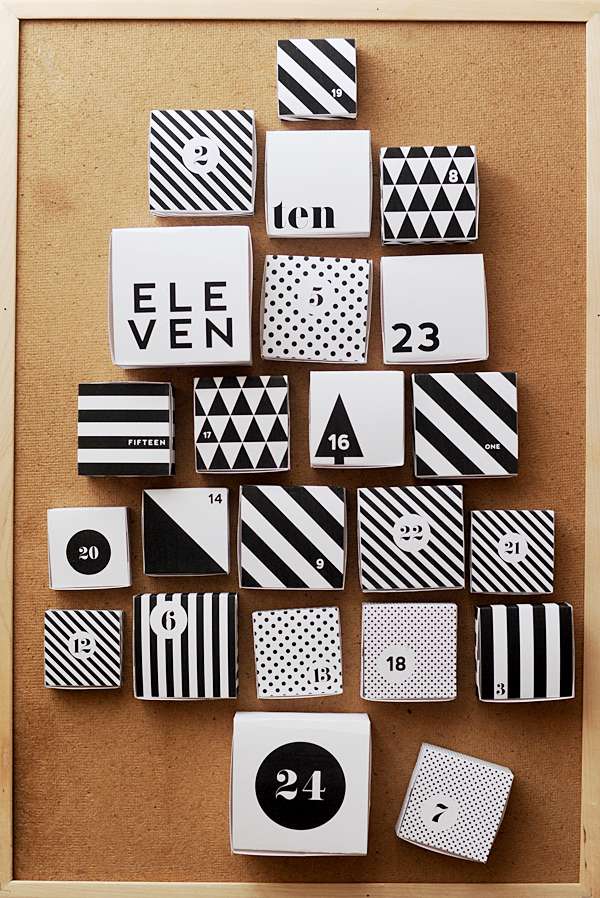
We can't believe how fast these past months have gone by. It was just summer and now it's almost December! Time to start thinking about the holidays and definitely time to plan the christmas calendar. So, I thought while I whip up a calendar for my daughter, I might as well make it a free printable for you. These little boxes are perfect for filling them with treats, little notes and other small surprises. I've made the printables extra-budget friendly and ink-saving. You'll only need a printer, black ink, card stock, scissors and glue.
Read below for instructions and find the printables in the end of this post.
Joulu tulee taas tuotapikaa ja Michaela päätti tehdä tyttärelleen joulukalenterin, jonka jaamme myös teidän kanssa. Kalenteri on muste-ystävällinen ja erittäin edullinen ja helppotekoinen! Tarvitset vain mustaa mustetta, kartonkia, sakset ja liimaa.
Alta löydät teko-ohjeet ja linkin kuvien tulostamiseen.
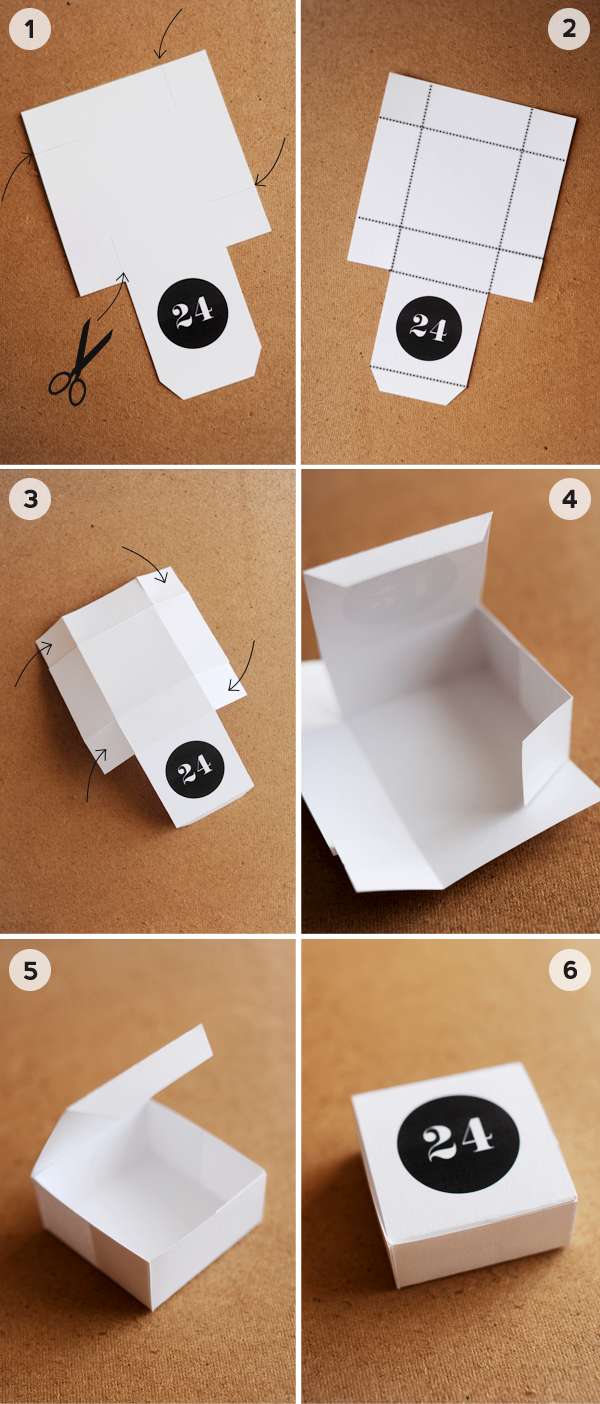
1 - print out the pdfs on card stock in a color of your choice. I've gone for a simple white, textured paper (280g/m2), because I still love black & white. Once you've printed out all templates, cut along the outer lines of each box. Then cut into the template along the fine lines as shown in picture 1.
2 - Fold the template over a ruler as shown in picture 2. Now those dotted lines are not actually printed onto the box templates, I've drawn them into the photo so you can see clearly where to fold the boxes. The ready folded template should look as shown in picture 3.
3 - Add paper glue or double sided tape onto the folded squares as shown in picture 3.
4 - Now fold the template into a box, glueing the side folds in one by one.
5 - And you're done! Fill your boxes with treats.
6 - Now you can either simply fold in the top or fix it with a little sticker. Especially if you want to mount your calendar and fill it with heavy treats, the sticker might be a good idea.
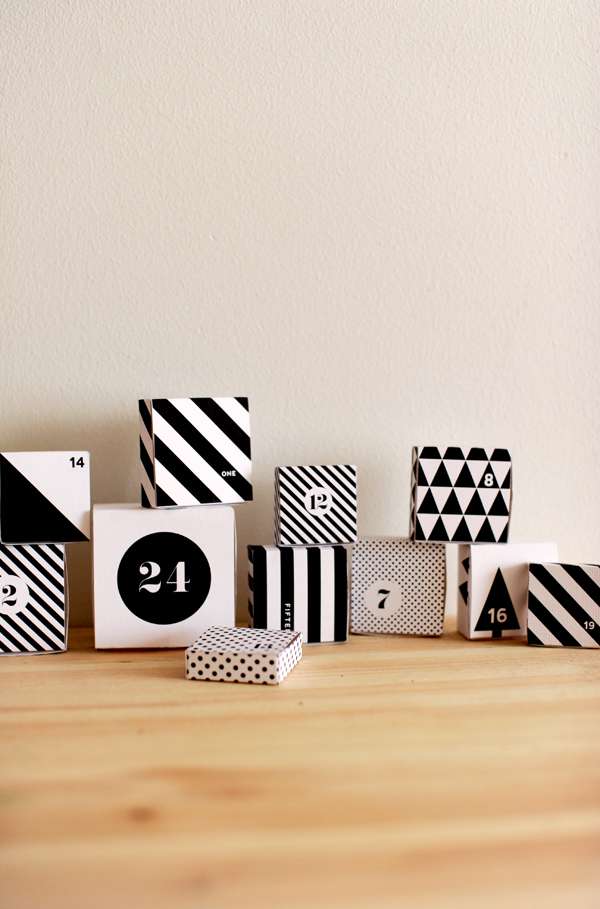
I will mount my calendar boxes in shape of a christmas onto a pin board or plywood. To do this, glue the backs of the boxes to a board of plywood or pin the open boxes onto a board with flat white pushpins. Like this, after the holidays, you can store it in the cellar or attick and re-use it next year!
1. Printtaa PDF-tiedosto haluammalesi värillisille kartongille (280gr kartonki on hyvä boxeille). Leikkaa ulkoreunojen mukaan laatikon muoto. Tämän jälkeen leikkaa ohuiden linjojen mukaisesti (Kuva 1).
2. Taita laatikon muoto viivottimen avulla. Huom. kuvan 2 viivat eivät ole printtaituna pohjiin, ne ovat vain havainnollistamassa taittoviivoja. Valmiiksi taitettu malli tulisi näyttää samalta kuin kuvassa 3.
3. Lisää paperiliimaa tai kaksipuoleistateippiä taittettuihin neliöihin, jotka näkyvät kuvassa 3.
4. Nyt taita pohja laatikon muotoon, liimaamalla sivut yksi kerrallaan.
5. Olet valmis! Täytä laatikot herkuilla.
6. Kannen voi joko taittaa tai teipata kiinni, teippaus on suositeltavaa eteenkin jos sinulla on raskaita karkkeja yllätyksenä.
Asettele laatikot haluamaasi muotoon korkkiruuvitaululle tai puulevylle. Voit joko liimata laatikoiden takaosat puulevyyn tai kiinnittää nastoila korkkiruuvitauluun. Jos käytät nastoja, voit helposti varastoida kalenterin ja käyttää sitä uudelleen ensi vuonna!
Enjoy!
This free printable is for personal use only. Please, do not re-distribute. But feel free to link to this post if you want to share this DIY on your blog or website! For more info on sharing, content and image copyright, please read our disclaimer here.
Cheers,
Michaela
magnifique gift!
ReplyDeleteThank you! Im always thankful for printables!
ReplyDeleteMelissa
http://shakeshakee.blogspot.com
I love this! I think I'll print it and let the kids and a couple friends color the white spaces green and red, etc., then put them on a gold or silver poster board with a little saying or surpise inside each box. =) Thanks for sharing!
ReplyDeleteThis is so great..i love it. I just made us an advent calendar last year that is reusable so I'm going to tuck this gem tutorial away for another time!
ReplyDeleteThat's so cute! Thanks for sharing!
ReplyDeleteStefanie
Love it! Black and white forever! Terkut Kanadasta! :)
ReplyDeleteI am in black and white heaven thankyou thankyou I absolutely love it.
ReplyDeleteYou're doing a fantastic job on your blog! I love your DIYs. I know how much work that is and how difficult it is to find and create unique ideas but you have and show them and I love it! I shared it with my facebook blog site, hope that's fine with you. http://www.facebook.com/ohhhmhhh
ReplyDeletePlease keep doing what you're doing. You & your blog are very inspirational!
Best wishes,
Steffi
That's sososo great. Thank you. THANK YOU!!! chris
ReplyDeleteI really love your printable calendar! I would write about the calendar at my blog and link to your site.. if it's ok?
ReplyDeleteThank you very much for this cool idea and print out.
ReplyDeleteI absolutely love this! Thank you so much!!
ReplyDeleteoh,i love this soooo ,
ReplyDeletethank you very much
xxo greetings from germany
brigitte
Where is 4?
ReplyDeleteOh, someone DID notice! Number 4 was under the table. I only noticed when I had already put the blog post online. So, don't worry - there IS a number 4 in the printable :)
ReplyDeletewonderful!
ReplyDeletethis is amazing! Thanks for sharing!
ReplyDeletemerci merci beaucoup
ReplyDeleteHi! I had to try it. Thanks a lot!!! I posted a link to my, I have to admit, not so perfect version at: http://www.solebich.de/diy-adventskalender-von-heylook/270625. I hope this is fine for you.
ReplyDeleteThanks for sharing! I made mine :)
ReplyDeleteJ'adore!!
ReplyDeleteP.S I added some lights to it and I love the result: http://eliisainen.blogspot.fi/2012/11/kalenteri-diy.html
ReplyDeleteThank you for solving my Advent Calendar -crisis!
ReplyDeletethat's lovely!!! I tried with one box and it's so nice! I was about to abandon the idea of an advent calendar because I'm so late, but you reascued me! :-)
ReplyDeleteThis is awesome, I can't wait to make it! Thanks for sharing this :)
ReplyDeleteThank you for this template. I finished my calendar last night and can't wait for tomorrow when my son can open the first box.
ReplyDeletehttp://katisway.blogspot.fi/2012/11/advent-calendar.html
Thankes for your work, my kids were really surprised ;-)
ReplyDeleteHello, and well done for this amazing work. I passed by this work on Behance, maybe you should check this work inspired by your project.
ReplyDeletehttp://blog.heylook.fi/2012/11/free-printable-diy-christmas-calendar.html
Peace and love
Sorry i mean that link:
ReplyDeletehttp://www.behance.net/gallery/Christmas-Countdown-Calendar/6095417
Just finished mine. Thanks for this easy, last-minute, project!
ReplyDeletehttp://ketoews.blogspot.com/2012/12/craft-time-advent-calendar-2012.html#
I'm late, but i'm gonna finish it tonight! I love it!! Thank you ♡
ReplyDeleteAivan ihana kalenteri! Monta hetkeä olen surffaillut sopivaa kalenteria etsimässä ja nyt se löytyi:) Kertoisitko, minkä kokoinen taulu sulla on pohjana?
ReplyDeletegreat idea. what size is the pin board?
ReplyDeleteI absolutely love this calendar! So cute!
ReplyDeletewhy can't I printed it with the borders??? I don't see the cut lines in the pdf
ReplyDeleteUn grand merci pour ce tuto ! L'impression est impeccable... résultat bientôt !
ReplyDeletelaurie, you may not see the cut lines in the pdf on screen depending on what software or browser you're viewing this on. when you print it out, they will be visible for sure though!
ReplyDeletecheers
Michaela / Hey Look
It's offensively easy to seek out any matter on web as compared to books, as I found this text at this website.
ReplyDeletebubblegum casting
I love all details that you give in your articles.
ReplyDeletebubblegum casting
Really amazing blog, I’d love to discover some extra information. best shampoo for hair loss
ReplyDeleteWaooow!! Nice blog, this will be greatly helpful.
ReplyDeletecustom id cards
I never ever read such type of info before this was really incredible. bubblegum casting reviews
ReplyDeleteYour content is such like that nobody will stop to come back that’s really rewarding.
ReplyDeleteLearn About it
Your blogs stuff is purely enough for me personally.
ReplyDeleteRead Full Report
Your website is for sure worth bookmarking.
ReplyDeleteRead Full Article
Your blogs and every other content are thus interesting and helpful it makes me return back again..
ReplyDeletego here
I would be appreciating all of your articles and blogs as a result of their suiting up mark.
ReplyDeletecredit repair
It’s my first time to visit this site & I’m really surprised to see such impressive stuff out there.
ReplyDeletealarm systems
This post is really valuable that designed for the new visitors. Pleasing work, keep on writing.
ReplyDeletebest home alarm system
auto insurance quotes comparison
ReplyDeletecongratulations guys, quality information you have given!!!
I have been dotty by reading your blog because it has a unique data. Height Increasing Shoes
ReplyDeleteThis is really pretty cool place I like it because it has everything I want more on this blog soon. Height Increasing Shoes
ReplyDeleteThe writer understand better the mind of people what they want to learn through their writing therefore this article is outstanding. Thanks!!!phlebotomist training course
ReplyDeleteThis article is actually remarkable one it helps many new users that desire to read always the best stuff.phlebotomy certificate
ReplyDeleteIt’s truly a nice and helpful piece of information. I am glad that you simply shared this useful info with us. Please stay us informed like this. Thanks for sharing.
ReplyDeletediscountboxprinting.com
The blog is unique that’s providing the nice material. Please post more interesting articles here. bestdrink recipes
ReplyDeleteI want to say thank to you people for this great and helpful info. Thanks!!! cancer treatments
ReplyDeleteYou have to waste less time to search your obligatory matter on web, because these days the searching ways of search engines are nice. That's why I found this article at this point. certified phlebotomy technician get a job abroad
ReplyDeleteYou have to waste less time to search your obligatory matter on web, because these days the searching ways of search engines are nice. That's why I found this article at this point. certified phlebotomy technician get a job abroad
ReplyDeleteThank You SO much for these printables. I have been searching for this exact type boxes for my advent calendar so that I can use different colored card stocks.
ReplyDeleteIt is wonderful that you make them for all to enjoy and use. I appreciate your creative mind generous spirit.
I really delight in whilst I go through your blogs and articles.food sfor weight loss
ReplyDeleteDefinitely why you get thus several blog comments.food sfor weight loss
ReplyDeletei like your blog, and this a very good blog.
ReplyDeletethank you for published it.
cheapboxprinting,com
I sent your articles links to all my contacts and they all adore it including me.credit people
ReplyDeleteI sent your articles links to all my contacts and they all adore it including me.credit people
ReplyDeleteمكافحة حشرات بالمدينة المنورة
ReplyDeleteتنظيف خزانات بجدة
شركة تنظيف منازل بجدة
شركة تنظيف فلل بجدة
كشف تسربات المياة بجدة
شركة تنظيف فلل بجدة
شركة تنظيف بجدة
شركة نقل أثاث برأس التنورة -
شركة كشف تسرب المياه بالهفوف
شركات فى المملكة
تخلص من الحشرات
نقل وتخزين الأثاث بجودة عالية
جلى البلاط والرخام
نظافة المسابح
شركة رش مبيدات بالدمام
ReplyDeleteشركة تنظيف منازل بالدمام
شركة كشف تسربات المياه بالدمام
شركه عزل خزانات بالدمام
شركة تسليك مجارى بالدمام
شركة تخزين اثاث بالدمام
شركة تنظيف منازل بالدمام
شركة تسليك مجاري بالدمام
شركة تنظيف بالدمام
شركة تنظيف خزانات بالمدينة المنورة
شركة كشف تسربات المياه
Fantastic work man, keep your heads high you did it. linden method
ReplyDeleteFantastic work man, keep your heads high you did it. linden method
ReplyDeleteWhat a great blog it is!!! You are in truth on your way to colossal success. Well done. pay advance loan
ReplyDeleteWhat a great blog it is!!! You are in truth on your way to colossal success. Well done. pay advance loan
ReplyDeleteDue to the fact days the seeking methods for search engines like google are good, it is important to waste a shorter time to search your obligatory issue on world wide web. why not try this out PrinterPassbook.co.id
ReplyDeleteI'm certainly very happy to read this blog site posts which carries plenty of helpful data, thanks for providing such information. book a room medina
ReplyDeleteI'm certainly very happy to read this blog site posts which carries plenty of helpful data, thanks for providing such information. book a room medina
ReplyDeleteLooking forward to reading more. Great article. Really thank you!
ReplyDeleteReally informative article post.Really looking forward to read more. Really Great.
ReplyDeleteYour work article, blogs I mean over all contents is must read material. best electric shaver blog
ReplyDeleteYour work article, blogs I mean over all contents is must read material. best electric shaver blog
ReplyDeletehttp://reale-state-websites.blogspot.com/
ReplyDeletehttp://blogforphotos2015.blogspot.com/
ReplyDeleteصور
ReplyDeleteصور جميله
صور حلوه
http://reale-state-websites.blogspot.com/
repair credit
ReplyDeleteYou entirely go with our expectation and the range of our information.
thank you
ReplyDeletethank you
thanks
ReplyDeletethank u
ReplyDeletethanks for you topic i Loved the photos
ReplyDeletethanx very much
ReplyDeleteIt is a unique and appreciable gift for our loved ones specially children. Its looks like a cool and valuable idea and a perfect version to make anyone happy. Black and white combination gives awesome look. I just love the way of creation and details about the box. These are a perfect match to give surprise and create fun. Contents are such that I think nobody can stop himself from reading. So I just love the article.
ReplyDeletecheap custom boxes
Thanks for sharing this article.
ReplyDeleteRegards,
IvoryPrint.com
Awesome idea I love your blog. This is very easy but useful idea. Hats off to your creative mind. I never see such an easy tutorial before. You give something unique to impress my child. Keep on posting. Window Gable Boxes
ReplyDeleteI love it! it`s so amazing! thank you sooo much! other people would sell it for quite a lot of money and you offer something this beautiful for free! that`s real christmas spirit!!!
ReplyDeleteThank you for your post. Really looking forward to read more. Cool.
ReplyDeleteشقق للبيع Really appreciate you sharing this blog post. Really thank you! Really Cool.
ReplyDeleteكتاب سيو Thank you ever so for you blog article. Thanks Again. Really Great.
ReplyDeleteبرامج سيو Really appreciate you sharing this blog post.Thanks Again. Fantastic.
ReplyDeleteI would be flattened if all websites gave articles like that. protect america security
ReplyDeleteYour blog! What should I say in its praise… relevant, lastly something which surely helped me? Thanks home security system
ReplyDeleteThe whole thing is extremely open and clear details of issues. It’s true information. Your website is very helpful. Thanks for sharing. best home security companies
ReplyDeleteNice information for the new users as well, it has increased our interest more. Keep it up.,, umrah package
ReplyDeleteNice information for the new users as well, it has increased our interest more. Keep it up.,, umrah package
ReplyDeleteI am very overwhelmed with your blog. The quality of the content really makes it an actual winner! hajj 2014
ReplyDeletegood post
ReplyDeleteشكرا جدا على موضوعك الاكثر من رائع
ReplyDeleteReally amazing blog!!! I enjoyed the complete article? enormous written. High PR blog post service
ReplyDeleteReally amazing blog!!! I enjoyed the complete article? enormous written. High PR blog post service
ReplyDeleteاكشرك اخي الكريم على موضوعك ودعمك المتواصل
ReplyDeleteSomeone I work using sessions your blog in many cases along with advisable the item to me to learn in addition. The actual writing style is definitely excellent and the submissions are useful. Information information you provide the visitors!
ReplyDeletehardsten keukenblad
I wanna thanks to a great extent for providing such informative and qualitative material therefore often.payday loan
ReplyDeleteYour website is terribly informative and your articles are wonderful.pay day loan
ReplyDeleteThanks for the entire information you have given here to impart knowledge amongst us? when do i have to pay my auto insurance deductible
ReplyDeleteThanks for the entire information you have given here to impart knowledge amongst us? when do i have to pay my auto insurance deductible
ReplyDeleteI bookmarked this web. I will come back to continue learning about your web design.I’m glad Yahoo pointed me to it. I was able to get the know-how I was searching so badly for days now.Thank You very much for your really good web page. Have a good day.It’s very useful for everyone for sure.
ReplyDeleteGreat blog! Really amazing!
ReplyDeleteIts cool there is a site out there dedicated to fairness and equity for our youth. Hope more people create sites like this.
ReplyDeletebadgarnituur
ReplyDeleteشركة تنظيف خزانات بجدة
شركة تنظيف منازل بجدة
شركة تنظيف بالدمام
شركة تنظيف شقق بالدمام
شركة تنظيف فلل بالدمام
شركة تنظيف بمكة
شركة تنظيف وعزل خزانات بمكة
شركة تنظيف بمكة
شركة تنظيف وعزل خزانات بالمدينة المنورة
شركة تنظيف فلل بمكة
شركة تنظيف مجالس بالبخار بمكة
شركة تنظيف بالمدينة المنورة
I found your blog in the directory of blogs, your blog looks awesome. Have a nice day. denture calgary
ReplyDeleteThis text is really worth everyone’s concentration. It sounds really go0o0d. Health Insurance Fort Lauderdale
ReplyDeleteal3ab hguhf al3ab banat al3ab talbis العاب بنات العاب تلبيس العاب بنات فقط العاب طبخ العاب ماهر العاب فلاش العاب ميدو موقع العاب موقع ميدو g100g y8 g9g ttt4 العاب سيارات
ReplyDeleteAn unbelievable blog. This blog will indisputably be definitely recommended to my friends as well.ID Kit
ReplyDeleteI generally don’t comment in the Blogs but your blog is the only one that forced me to, amazing work... Health Insurance Jacksonville
ReplyDeleteI generally don’t comment in the Blogs but your blog is the only one that forced me to, amazing work... Health Insurance Jacksonville
ReplyDeleteHi there to all, the post stuff present here is actually wonderful for people awareness, well, carry on the good work friends. Health Insurance Fort Lauderdale
ReplyDeleteExcellent blog here. It’s out-of-the-way quality writing. If truth be told I appreciate the people like you! Take care Health Insurance Clearwater
ReplyDeleteAmazing! I felt this site as a better option to select the blog so I came here. orogold cosmetics
ReplyDeletehọc kế toán tại tphcm, học kế toán tại quảng ninh, học kế toán tại hải dương, học kế toán tại bắc giang, trung tâm đào tạo kế toán tại bắc ninh, học kế toán tại hải phòng, học kế toán tại nam định, học kế toán tại thái bình, học kế toán tại thanh hóa, học kế toán tại vĩnh phúc, học kế toán tại hưng yên, học kế toán tại phú thọ, học kế toán tại bình dương, học kế toán tại nghệ an, học kế toán tại vũng tàu, học kế toán tại đồng nai, khóa học kế toán cho giám đốc, học kế toán tổng hợp
ReplyDeleteThe Iranians insist they have never worked on weapons and have turned down IAEA requests to visit sites where the agency suspects such work was going on, including Parchin, the military complex near Tehran where the agency believes explosives testing linked to setting off a nuclear charge was conducted.
Iran's acceptance in principle of access to military sites will give the agency extra authority in its attempts to go to the site and its demands — previously rejected by Tehran — to interview scientists it suspects were involved in the alleged nuclear weapons work.
Dịch vụ báo cáo tài chính tại Quận 9, Dịch vụ báo cáo tài chính tại Quận 10, Dịch vụ báo cáo tài chính tại Quận 11, Dịch vụ báo cáo tài chính tại Quận 12, Dịch vụ báo cáo tài chính tại Quận Thủ Đức, Dịch vụ báo cáo tài chính tại Quận Gò Vấp, Dịch vụ báo cáo tài chính tại Quận Phú Nhuận, Dịch vụ báo cáo tài chính tại Quận Tân Phú, Dịch vụ báo cáo tài chính tại Quận Bình Thạnh, Dịch vụ báo cáo tài chính tại Quận Bình Tân, Dịch vụ báo cáo tài chính tại Quận Tân Bình, Dịch vụ báo cáo tài chính tại Huyện Hóc Môn, Dịch vụ báo cáo tài chính tại Huyện Củ Chi, Dịch vụ báo cáo tài chính tại Huyện Bình Chánh, Dịch vụ báo cáo tài chính tại Huyện Nhà Bè, Dịch vụ báo cáo tài chính tại Huyện Cần Giờ, trung tâm kế toán, kế toán tổng hợp, tài liệu kế toán, hình nền đẹp, http://www.tosvn.com , sửa máy in 368, đổ mực máy in tại nhà, sửa máy in tại nhà, sửa máy tính tại nhà,
ReplyDeleteشركة مكافحة حشرات بمكة
ReplyDeleteمكافحة حشرات بمكة
شركة صقر البشاير تقوم بالتخلص من جميع الحشرات التى تنتشر فى المنزل بكل سهولة وباستخدام اجود المبيدات الحشرية التى تقضى على جميع الحشرات الزاحفة والطائرة كما ان اهذه المبيدات امنة على صحة الانسان فلا
داعى للقلق على اولادك نحن شركة مكافحة حشرات بمكة والطائف ونعمل بامان تام حتى لا تؤثر المبيدات سلبيا عليك وعلى اسرتك
كما اننا لدينا عروضا خاصة للشركات والمؤسسات الكبرى
اتصل بنا على 0500941566 - 012/5576261
شركة مكافحة حشرات بالطائف
مكافحة حشرات بالطائف
You have really selected the suitable topic; this is one of my favorite blogs. Calisthenics Workout
ReplyDeleteThanks for the entire information you have given here to impart knowledge amongst us? local seo company
ReplyDeleteYou have really selected the suitable topic; this is one of my favorite blogs. local seo services
ReplyDeleteAmazing
ReplyDeleteWhiteDust
ReplyDeleteWhat an awesome idea, I'll put it on my website to spread it :)
ReplyDeleteشركة تنظيف بالرياض
ReplyDeleteشركة تنظيف فلل بالرياض
شركة تنظيف شقق بالرياض
شركة تنظيف مجالس بالرياض
شركة تنظيف خزنات بالرياض
شركة مكافحة حشرات بالرياض
شركة تخزين اثاث بالرياض
شركة تسليك مجارى بالرياض
ReplyDeleteالعاب فلاشالعاب بنات
العاب تلبيسالعاب طبخالعاب اطفالالعاب ديكورالعاب اكشنالعاب رياضةالعاب سياراتالعاب ذكاءالعاب تلوينالعاب مكياجالعاب قص شعرالعاب تنظيف البشرةfrivلعبة المزرعة السعيدةلعبة المافيالعبة كراشلعبة صب وايالعاب غامبوللعبة جاتاالعابالعاب 2016العاب ماريوالعاب اكشنالعاب بن تنالعاب بناتالعاب تلبيس بناتالعاب ديكورالعاب سبونج بوبالعاب سياراتالعاب سونيكالعاب كراشالعاب طبخ
العاب قنص
Thank you for a nice post, I really enjoyed it
ReplyDeleteso cute ! thanks very much
ReplyDeletevery nice blog and thanks for sharing
ReplyDeleteKiitos, eksyin tänne ihan vahingosa ja sehän ratkaisi kalenteriongelmani :)
ReplyDeletehttp://jouluni.blogspot.fi/2015/11/kalenteri-mielessa.html
ReplyDeleteشركة تنظيف بالرياض
شركة تنظيف فلل بالرياض
شركة تنظيف شقق بالرياض
شركة تنظيف مجالس بالرياض
شركة تنظيف واجهات بالرياض
شركة كشف تسربات المياه بالرياض
شركة كشف تسربات بالرياض
شركة مكافحة حشرات بالرياض
شركة نقل اثاث بالرياض
شركة رش مبيدات بالرياض
شركة تسليك مجارى بالرياض
شركة عزل خزانات بالرياض
شركة تنظيف بالدمام
شركة تنظيف فلل بالدمام
شركة تنظيف شقق بالدمام
شركة تنظيف مجالس بالدمام
شركة تنظيف واجهات بالدمام
شركة كشف تسربات المياه بالدمام
شركة كشف تسربات بالدمام
شركة عزل خزانات بالدمام
شركة مكافحة حشرات بالدمام
شركة نقل اثاث بالدمام
شركة رش مبيدات بالدمام
شركة تسليك مجارى بالدمام
شركة تنظيف بجازان
شركة تنظيف فلل بجازان
شركة تنظيف شقق بجازان
شركة تنظيف مجالس بجازان
شركة تنظيف واجهات بجازان
شركة كشف تسربات المياه بجازان
شركة كشف تسربات بجازان
شركة عزل خزانات بجازان
شركة مكافحة حشرات بجازان
شركة رش مبيدات بجازان
شركة نقل اثاث بجازان
شركة تسليك مجارى بجازان
شركة تنظيف بالرياض
ReplyDeleteشركة تنظيف فلل بالرياض
شركة تنظيف شقق بالرياض
شركة تنظيف مجالس بالرياض
شركة تنظيف واجهات بالرياض
شركة كشف تسربات المياه بالرياض
شركة كشف تسربات بالرياض
شركة مكافحة حشرات بالرياض
شركة نقل اثاث بالرياض
شركة رش مبيدات بالرياض
شركة تسليك مجارى بالرياض
شركة عزل خزانات بالرياض
شركة تنظيف بالدمام
شركة تنظيف فلل بالدمام
شركة تنظيف شقق بالدمام
شركة تنظيف مجالس بالدمام
شركة تنظيف واجهات بالدمام
شركة كشف تسربات المياه بالدمام
شركة كشف تسربات بالدمام
شركة عزل خزانات بالدمام
شركة مكافحة حشرات بالدمام
شركة نقل اثاث بالدمام
شركة رش مبيدات بالدمام
شركة تسليك مجارى بالدمام
شركة تنظيف بجازان
شركة تنظيف فلل بجازان
شركة تنظيف شقق بجازان
شركة تنظيف مجالس بجازان
شركة تنظيف واجهات بجازان
شركة كشف تسربات المياه بجازان
شركة كشف تسربات بجازان
شركة عزل خزانات بجازان
شركة مكافحة حشرات بجازان
شركة رش مبيدات بجازان
شركة نقل اثاث بجازان
شركة تسليك مجارى بجازان
HI. This calender is amazing. Can i have the link to do it by myself? I cant find any link anymore...tat would be so awesome. Thank you
ReplyDeleteWow Amazing Calender is this. Read More About Christmas Loans.
ReplyDeleteالعاب باربي
ReplyDeleteالعاب بنات
العاب تلبيس
You have a very inspiring way of exploring and sharing your thoughts.
ReplyDeleteangel investors india
Thank you, I've been seeking for info about this subject matter for ages and yours is the best I have discovered so far.
ReplyDeletebuy condos Brampton
This is a very good post which I really enjoy reading. It is not every day that I have the possibility to see something like this.
ReplyDeleteenablersinvestment
thank you so much for sharing this article
ReplyDeletehttp://quotedpictures.com
http://solutiondots.com/
http://thenethawks.com
I have bookmarked you to check out new stuff of your blog. A must read!!!!
ReplyDeletestartup investment platform
شركة تنظيف بالبخارغسيل كنب موكيت سجاد
ReplyDeleteشركة تسليك مجارى بالرياض
شركة غسيل كنب بالرياض
thank you all @on ap lioa
ReplyDeletelioa
sua lioa
sua ups
on ap lioa
lioa
lioa
Quickly this site will indisputably be famous among all blogging people, because of its fastidious articles or reviews. prenup attorney nyc
ReplyDeleteIt's not my very first time to visit this blog; I’m visiting this daily and acquire superb info from here day by day. ny prenuptial agreement attorney
ReplyDelete
ReplyDeleteشركة رش مبيدات بالرياض
شركة مكافحة حشرات بجدة
شركة رش مبيدات بجدة
شركة مكافحة الحشرات بمكة
شركة مكافحة حشرات بالدمام
شركة رش مبيدات بالدمام
شركة كشف تسربات بالرياض
شركة كشف تسربات المياه بالرياض
كشف تسربات
شركة كشف تسربات المياه بجدة
شركة تسربات المياه بالدمام
شركة عزل خزانات بالرياض
شركة عزل اسطح بالرياض
شركة تسليك مجاري بالرياض
شركة شفط بيارات بالرياض
شركة تنظيف بجدة
شركة تنظيف فلل بجدة
شركة تنظيف شقق بجدة
شركة تنظيف خزانات بجدة
شركة تنظيف منازل بجدة
great website filled with lots of useful information
ReplyDeletekik hacker https://storify.com/kikhackspyware/kik-hack-spyware/
شركة تيم كلين
ReplyDeleteشركة تنظيف بالدمام
شركة مكافحة حشرات بالدمام
شركة تنظيف
شركة تنظيف فلل بالدمام
شركة تنظيف فلل بالرياض
شركة تنظيف شقق بالرياض
شركة مكافحة حشرات بالرياض
شركة نقل اثاث بالرياض
شركة تنظيف بالرياض
شركة تنظيف بجده
شركة تسليك مجارى
شركة تنظيف بالدمام
تنظيف منازل
ReplyDeleteشركة رش مبيدات بابهاا
شركة رش مبيدات بجازان
شركة رش مبيدات بخميس مشيط
شركة رش مبيدات بنجران
شركة كشف تسربات بابهاا
شركة كشف تسربات بخميس مشيطا
شركة مكافحة النمل الابيض بابهاا
شركة مكافحة النمل الابيض بخميس مشيط
شركة مكافحة حشرات بابها
شركة مكافحة حشرات ببيشةا
شركة مكافحة حشرات بجازان
شركة مكافحة حشرات بخميس مشيط
شركة مكافحة حشرات بنجران
شركة نظافة عامة بابها
شركة نظافة عامة بخميس مشيط
شركة نقل اثاث بابها
شركة نقل اثاث بخميس مشيط
شركة نقل عفش بابها
شركة نقل عفش بخميس مشيط
شركةرش مبيدات ببيشة
شركة مكافحة النمل الابيض بنجران
شركة مكافحة النمل الابيض بجازان
شركة مكافحة نمل ابيض ببيشة
شركة تنظيف بابها
شركة تنظيف ببيشة
شركة تنظيف بجازان
شركة تنظيف بخميس مشيط
شركة تنظيف بنجران
ReplyDeleteشركة مكافحة حشرات بخميس مشيط
شركة تنظيف خزانات بابها
شركة تنظيف خزانات بحائل
شركة نظافة عامة بابها
شركة تنظيف بحائل
شركة تنظيف بخميس مشيط
شركة تنظيف بخميس مشيط
شركة تنظيف ببيشة
شركة تنظيف بابها
شركة نظافه عامه بخميس مشيط
شركة تنظيف مجالس بحائل
شركة تنظيف مجالس بنجران
شركة تنظيف بابها
شركة تنظيف خزانات بحائل
شركة تنظيف خزانات بخميس مشيط
شركة تنظيف خزانات بنجران
شركة تنظيف خزانات بابها
شركة تنظيف منازل بابها
شركة تنظيف منازل بنجران
شركة تنظيف موكيت بحائل
شركة تنظيف منازل بحائل
شركة تنظيف منازل بحائل
شركة تنظيف منازل بخميس مشيط
شركة تنظيف منازل بنجران
شركة تنظيف شقق بابها
شركة تنظيف شقق بحائل
شركة تنظيف شقق بخميس مشيط
شركة تنظيف شقق بنجران
شركة نقل اثاث بابها
شركة نقل اثاث بحائل
شركة نقل عفش بحائل
شركة نقل عفش بحائل
شركة نقل اثاث بنجران
شركة نقل اثاث بخميس مشيط
شركة كشف تسربات المياه بحائل
شركة كشف تسربات المياه بابها
شركة كشف تسربات المياه بخميس مشيط
شركة تسليك مجارى بحائل
شركة تسليك مجارى بخميس مشيط
شركة تسليك مجارى بنجران
شركة تسليك مجارى بابها
شركة تسليك مجارى بحائل
شركة عزل خزانات بحائل
شركة رش مبيدات بابها
ReplyDeleteشركة مكافحة حشرات بابها
شركة مكافحة حشرات بجازان
شركة رش مبيدات بجازان
شركة رش مبيدات بحائل
شركة مكافحه حشرات بحائل
شركة رش مبيدات بخميس مشيط
شركة رش مبيدات ببسشة
شركة مكافحة حشرات ببيشة
شركة مكافحة حشرات بنجران
Valentine Day Funny Quotes
ReplyDeleteValentine Day Cards
Happy Rose Day Pictures
Valentines Day Ideas
Happy Promise Day Images
Valentines Day Free SMS
Valentines Day Greeting Card
Valentine Day Shayari
Valentines Day Poems
Propose Day Images
Chocolate Day Greeting Cards
Valentines Day 2016 Free Clipart
Free Funny Images
Chocolate Day Images For Free Download
Valentines Day Funny Greetings Card
Happy Valentines Day Messeages
Promise Day Hindi Quotes
Happy Kiss Day Greetings Cards
Happy Valentine Day Wishing Cards
Happy Rose Day Wishes Quotes
Happy Valentine Day Animated Quotes
Happy Hug Day Messeages
Happy Rose Day Quotes
Happy Valentines Day SMS Quotes
A very awesome blog post. We are really grateful for your blog post.
ReplyDeletestartup fundraising
شركة كشف تسربات المياه بالرياض
ReplyDeleteشركة تخزين اثاث بالرياض
شركة تخزين اثاث في الرياض
شركة تخزين اثاث
شركات تخزين اثاث بالرياض
ReplyDeleteشركة تخزين عفش بالرياض
كشف تسربات المياه بالرياض
كشف تسربات المياه
شركة كشف تسربات المياه بالرياض
شركات تنظيف بالرياض
شركة مكافحة حشرات بالرياض
شركة مكافحة حشرات بالدمام
افضل شركة نقل اثاث بالرياض
شركة تنظيف شقق بجده
شركة تنظيف فلل بجده
شركة تنظيف بجده
شركة تسليك مجاري بالدمام
مكافحة الحشرات بالدمام
شركة تنظيف فلل بالدمام
شركة تنظيف منازل بالدمام
شركة تنظيف بالدمام
ReplyDeleteشركة تخزين اثاث بالرياض
شركة تخزين عفش بالرياض
شركة كشف تسربات المياه بالرياض
شركة كشف تسربات المياه بالرياض
شركة مكافحة حشرات بجدة
شركة تنظيف بجدة
شركة مكافحة النمل الابيض بالرياض
محلات شراء الاثاث المستعمل بالرياض
شركة غسيل خزانات بالمدينة المنورة
شركة تنظيف شقق بالمدينة المنورة
افضل شركة تنظيف بالرياض
شركة تنظيف بالرياض
الصفرات للتنظيف
شركة تخزين اثاث بالرياض
شركة مكافحة حشرات بمكة
شركة تنظيف بالرياض مجربه
شركة تنظيف بالاحساء
شركة شراء اثاث مستعمل بالرياض
شركات تخزين الاثاث بالرياض
ReplyDeleteشركة نقل اثاث بالدمام
شركة تنظيف فلل بالرياض الصفرات
شركة تنظيف فلل بالرياض
شركة تنظيف فلل شمال بالرياض
شركة تنظيف بالدمام
شركة مكافحة حشرات بالمدينة المنورة
شركة تنظيف بالمدينة المنورة
شركة تنظيف فلل بجدة
شركة تنظيف بالدمام
شركة مكافحة حشرات بالطائف
شركة مكافحة حشرات بحائل
شركة مكافحة حشرات بجازان
This comment has been removed by the author.
ReplyDeleteThis comment has been removed by the author.
ReplyDeletechasse
ReplyDeleteدانلود نرم افزار
ReplyDeleteسرویس طلا
فروشگاه طلا
قیمت طلا
طراحی وب سایت
ایمپلنت دندان
طراحی نرم افزار
خرید هاست
شرکت ساختمانی
مهندسی عمران
درج آگهی
کلینیک دندانپزشکی
دانلود آهنگ جدید
خرید بک لینک
کلینیک دندانپزشکی
دندانپزشکی بدون درد
عصب کشی
دندانپزشکی زیبایی
دندانپزشکی اطفال
جراحی لثه
ترمیم پوسیدگی
سفید کردن دندان
ایمپلنت دندانپزشکی
اشیعه نیوز
This is amazing and cool tnx
ReplyDeleteالعاب تلبيس
العاب بنات
العاب تلبيس بنات
al3ab
ReplyDeleteشركة نور الدمام
شركة تنظيف بالدمام
شركة تنظيف فلل بالدمام
شركة تنظيف شقق بالدمام
شركة تنظيف مجالس بالدمام
شركة تنظيف مسابح بالدمام
شركة كشف تسربات بالدمام
شركة تنظيف بالاحساء
شركة تنظيف فلل بالاحساء
شركة تنظيف شقق بالاحساء
شركة تنظيف مجالس بالاحساء
شركة تنظيف مسابح بالاحساء
شركة كشف تسربات بالاحساء
شركة تنظيف بالقطيف
شركة تنظيف فلل بالقطيف
شركة تنظيف بالرياض
ReplyDeletehttp://www.g300g.com
ReplyDeleteشركة الاصلاح افضل
ReplyDeleteشركة كشف تسربات المياه بالرياض لدينا فريق مخصص لكشف عن التسربات واصلاحها مع الضمان يصل الى 10سنوات على الاصلاح, تعتمد شركة الاصلاح عن كشف تسربات المياه بالاجهزة المتقدمة وانبيب طغظ النيتروجين والخبرة الطويله فى مجال صيانه المنازل واصلاحها ,لدينا فريق مخصص لعزل الاسطح وعزل الخزانات والجميع انواع العوازل المائيه والحراريه والصوتيه ,لدينا فريق مخصص وسيارت على حديثة لنقل الاثا ث بالرياض ,فريق مخصص لنظافة المنازل وغسيل الخزانات والنظافه العامة بالرياض, عماله مدربه على مكافحة جميع انواع الحشرات الزاحفة والطائرة نستخدم اقوى المبيدات الحشريه للقضاء على جميع انواع الحشرات بالرياض.
خدمتنا
كشف تسربات المياه
شركة كشف تسربات المياه بالرياض
شركات كشف تسربات المياه بالرياض
شركات كشف تسربات المياه
عزل الاسطح
شركه عزل اسطح
شركه عزل مائى
شركه عزل الاسطح
عزل خزانات
شركه عزل خزانات
شركه عزل مسابح
شركه نقل اثاث بالرياض
شركه نقل عفش بالرياض
شركه نقل اثاث
شركه نقل عفش
شركه نقل
شركه نقل اثاث بالرياض
شركه نقل عفش
مكافحة حشرات
شركه رش مبيدات
مكافحة حشرات بالرياض
ReplyDeleteشركة الروناء
شركة تنظيف منازل بخميس مشيط
تنظيف منازل بنجران
شركة تنظيف بجازان
شركة مكافحة حشرات بجازان
شركة تنظيف بابها
شركة تنظيف منازل بابها
شركة نقل اثاث بابها
شركة مكافحة حشرات بابها
شركة تنظيف بخميس مشيط
شركة نقل اثاث بخميس مشيط
شركة مكافحة حشرات بخميس مشيط
شركة تنظيف ببيشة
شركة تنظيف بنجران
شركة مكافحة حشرات بنجران
شركة نظافة عامة بابها
شركة نقل اثاث بابها
شركة تسليك مجارى ببيشة
شركة تنظيف ببيشة
شركة تنظيف خزانات ببيشة
شركة تسليك مجاري بابها
شركة تنظيف بابها
شركة تنظيف خزانات بابها
شركة تنظيف شقق بابها
شركة تنظيف منازل بابها
شركة رش مبيدات بابها
شركة مكافحة حشرات بابها
شركة تنظيف شقق ببيشة
شركة مكافحة حشرات ببيشة
شركة تنظيف شقق بجازان
شركة تنظيف منازل بجازان
شركة تنظيف شقق بجازان
شركة تنظيف منازل بجازان
شركة رش مبيدات بجازان
شركة مكافحة حشرات بجازان
شركة نقل اثاث بجازان
شركة تنظيف بحائل
شركة رش مبيدات بحائل
شركة تنظيف بخميس مشيط
شركة تنظيف خزانات بخميس مشيط
شركة تنظيف شقق بخميس مشيط
شركة تنظيف منازل بخميس مشيط
شركة رش مبيدات بخميس مشيط
شركة نظافة عامة بخميس مشيط
شركةتسليك مجارى بخميس مشيط
شركة تسليك مجارى بنجران
شركة تنظيف بنجران
شركة تنظيف شقق بنجران
شركة تنظيف منازل بنجران
شركة رش مبيدات بنجران
شركة مكافحة حشرات بنجران
شركة نقل اثاث بنجران
Very nice article.
ReplyDeleteCheck it how to use Whatsapp For Laptop Free Download here is the best solution
ReplyDeletebán biệt thự the manor central park;Vinhomes trần duy hưng;Dự án vinhomes liễu giai;The manor central park
ReplyDeleteVinhomes mễ trì;hoành phi câu đối;tủ thờ sập thờ
عمليه صيانه المنازل تتطلب عمل صيانه شامله للمنزل, اصلاح الحمامات والمطبخ وتغير السباكه القديمه للمنزل لضمان سلمه المبنى من
ReplyDeleteتسربات المياه
وان عمليه تسرب المياه فى المنزل تعنى الكثير من المشاكل تصل الى انهيار المبنى ولاتجنب هذة المشكله من الازم عمل
كشف تسربات المياه
للمنزل وتغير السباكه القديمه ,من اهم الاشياء الازم توافرها الاطمئنان على سباكه المنزل من التهريب ومن بعدياتى دور الدهانات والجبس تابع مع شركة الاصلاح كيفيه حل مشكلهكشف تسربات المياه
العاب تلبيس
ReplyDeletethanks for sharing
This comment has been removed by the author.
ReplyDeletethanks for sharing.
ReplyDeletenice
ReplyDeleteThank you for your post. Really looking forward to read more. Cool. i love this point
ReplyDelete5. Olet valmis! Täytä laatikot herkuilla. كشف تسربات المياه
كشف تسربات المياه بجده
شركة كشف تسربات بالرياض Really appreciate you sharing this blog post. Really thank you! Really Cool.
Really appreciate you sharing this blog post. Really thank you! Really Cool.
ReplyDeletevinhomes golden river,vinhomes golden river
ReplyDelete
ReplyDeleteشركة تسليك مجارى بالدمام
شركة تسليك مجارى بالدمام
شركة تسليك مجارى بالدمام
شركة تنظيف بالدمام
شركة رش مبيدات بالدمام
شركة عزل اسطح بالدمام
شركة كشف تسربات المياه بالدمام
شركة مكافحة النمل الابيض بالدمام
شركة نقل اثاث بالدمام
شركة تسليك مجارى بالخبر
شركة تنظيف بالخبر
شركة رش مبيدات بالخبر
شركة عزل اسطح بالخبر
لعبة السمكة
ReplyDeleteОтопительное оборудование
ReplyDeleteОтопительное оборудование
ReplyDeleteОтопительное оборудование
ReplyDeleteзаходите покупа
العاب
ReplyDeleteالعاب سيارات
العاب تلبيس
العاب حرب
العاب
العاب تلبيس بنات
العاب بن تن
العاب طبخ
العاب غامبول
العاب سبونج بوب
العاب كرة قدم
This comment has been removed by the author.
ReplyDeleteThis comment has been removed by the author.
ReplyDeleteThis comment has been removed by the author.
ReplyDeleteThis comment has been removed by the author.
ReplyDeleteThis comment has been removed by the author.
ReplyDeleteThis comment has been removed by the author.
ReplyDeleteديلي سبورت
ReplyDeleteاخبار مصر
اخبار مصر اليوم
اسعار الذهب
اسعار العملات
اخبار الاقتصاد
اخبار الرياضة
مباريات اليوم يلا كورة
يلا شوت بث مباشر
تكنولوجيا
اخبار تقنية
حظك اليوم
الابراج اليوم
برجك اليوم
This comment has been removed by a blog administrator.
ReplyDelete